Prima Marketing Inc. sent me a wonderful assortment of their products to pair with my Fiskars tools to create a few projects to share with you. Today, I’m sharing a few of those products with you and will explain how I created a Canvas Mixed Media Covered 12-month Calendar. The quilted canvas mixed media covers by Prima are a wonderful blank canvas just bursting with possibility. They have a subtle text resist on them allowing the pattern to peek through once they are altered with inks and mists.
To alter my canvas covers, I first placed a Prima stencil, measuring approximately 6” x 6” onto the front canvas cover making sure the area underneath and surrounding the cover was adequately protected. Then I began adding a layer of Chartreuse Color Shine. Once the Chartreuse was dry, I added a few more layers of Shimmer Mist and Color Shine.
After determining where my flower embellishments would go, I punched three hexagon shapes in a row out of a scrap piece of cardstock using my Hexagon Squeeze Punch and used this as a stencil in the area on the bottom right. I held the cardstock firmly in place and then applied Barn Door Distress Paint. Once that was dry, I added several layers of machine stitching around the perimeter of the larger Prima stenciled design.
Next, I cut a piece of pink burlap cut with Medium Design Set 100780-Circle.
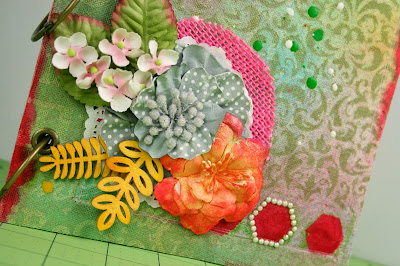
Then, hot-glued on the fabric and flower embellishments by first adhering the burlap circle to the lower right section of the cover. Layered on top of the burlap circle is a paper doily and several flower embellishments from Prima. My favorite is the Pewter Ascot Park style flower that anchors the center. The red-ish flower was created by adding layers of Mustard Color Shine and Barn Door Distress Paint to a cream colored flower. Because the flowers are made from a mulberry-like paper material they take paints, inks, and mists very well. To embellish further I added some wooden leaves from Prima from a set of Wooden Icons. These come as a natural wood so you can leave them natural or use paints or mists to color them. To give them a nice golden color they were sprayed with Mustard Color Shine. Lastly, I brushed the edges of the album in various places with Barn Door Distress Paint and then used Crayola Crayons along with my heat embossing gun to create drips of green, white, and mustard yellow wax on the album cover.
Full Disclosure: The Prima Marketing, Inc. products were supplied to me free of charge for the purpose of creating this tutorial. I was not compensated in addition to the free supplies. Again, I only agree to use products that I love and would shell out my own money for.


No comments:
Post a Comment
thank you for taking time to connect with me in this space! i will do my best to leave comments answering any questions you may ask. if you are commenting on an older post and you dont see your comment publish right away it is because I have comments set to be approved before publishing on any blog posts older than 10 days old due to a recent influx of comment spammers. i will see your comment, approve it and reply to you....if it isnt spam. xoxo :)